Software
The course makes use of a number of software packages that students will install on their computers. The following software are available for Windows, Mac, and Linux.
You will need to be connected to eduroam WiFi for most of what we want to do in class to work.
Please try to install all of this software on your computer before the first day of class.
0. Connect to the eduroam Wi-Fi network
For this class, you will not be able to the University of Washington Wi-Fi network for this class.
Instead, you need to be connected to eduroam.
For instructions on how to connect to eduroam, follow the “How to access the eduroam network” section on this page: https://uwconnect.uw.edu/it?id=kb_article_view&sysparm_article=KB0034255#howtouse.
1. Ensure you have access to a Unix-style terminal
macOS and Linux operating systems
Use your operating system’s program search (MacOS: spotlight search, Cmd-Space. Ubuntu: Ubuntu button in upper-left corner) up and search for Terminal.
You should get a window with a command prompt. Command prompt might have different words / characters, followed by a $ and cursor for text input. Late 2018 and newer MacOS computers default to zsh instead of bash. This difference will briefly be covered in class, but you can run bash [+ Enter] in the terminal if you choose to use that instead.
Windows 11 and Windows 10, version 1607+ (Windows Linux Subsystem)
All Windows users should note that the Windows command lines, cmd and PowerShell, differ greatly from the bash or zsh command prompt that software developers commonly use. From here on out, we will use “terminal” to refer to the Unix-style unless clearly and explicitly stated otherwise.
Note: Windows Linux Subsystem (WSL2, or the older WSL) is preferred over older Git Bash solutions. It’s faster, more similar to what you’ll see in class and has a more complete set of Unix programs.
Before trying the suggestions below, try opening the Windows Store (from your start menu) and search for Ubuntu 24+. It will be a free download and installing it “will just work” for most recent versions of Windows 11 on relatively new hardware.
If installing from the Windows Store does not work, we suggest following these instructions for installing a WSL distribution.
Some tips:
- We highly suggest using the Ubuntu 22.04 distribution. Ubuntu is one of the more beginner-friendly Linux distros and the instructor is also able to record screen captures for this setup.
- We suggest setting your Linux distribution username and password to match your Windows ones. This will reduce confusion!
2. Ensure that Git is installed
Type git --version into the terminal. If the terminal prints out any version number, you are successful. For example, my Macbook Pro returns git version 2.24.1 (Apple Git-126) and my Windows 10 WSL system returns s.
macOS note
Some students reported an error with git
xcode-select: note: no developer tools were found at
'/Applications/Xcode.app', requesting install. Choose an option
in the dialog to download the command line developer tools.
To fix this, do the following:
- Start a new Terminal
- Run the following command:
xcode-select --install - Click
Install - Click
Agreeto agree to the terms
For more information, see this link.
3. Create a GitHub.com account
Create a GitHub.com account on the GitHub website. This is a free account. We will discuss more on the Version Control I lecture. You will need to enter your GitHub username into the survey in the welcome email so that we can associate your GitHub username with your UW NetIT.
3.a. Setup GitHub SSH keys
SSH is tooling to interact with remote computers via a secure (encrypted) pathway. It uses public + private key pairs. You need to generate keys and share them with GitHub prior to this working. Below are instructions to do this.
First, make sure you don’t have an existing GitHub key that is already configured:
ssh -T git@github.com
This should say something like:
The authenticity of host 'github.com (192.30.255.112)' can't be established.
RSA key fingerprint is SHA256:nThbg6kXUpJWGl7E1IGOCspRomTxdCARLviKw6E5SY8.
This key is not known by any other names
Are you sure you want to continue connecting (yes/no/[fingerprint])? y
Please type 'yes', 'no' or the fingerprint: yes
Warning: Permanently added 'github.com' (RSA) to the list of known hosts.
git@github.com: Permission denied (publickey).
Make sure you type yes to continue connecting. If it says something like the following, you have nothing further to do and can skip to step 4, below.
Hi dacb! You've successfully authenticated, but GitHub does not provide shell access.
Next, see if you have any SSH keys:
ls -la ~/.ssh
If you see something like the following, you need to create keys:
ls: cannot access '/Users/dacb/.ssh': No such file or directory
If you see files listed that look like id_ed25519.pub you may be able to skip the key generation steps. Check with your TA or try skipping to 3b, below.
To create new keys, run the following command in your shell, swapping in your email that you used for the GitHub account for my.email@my.email.account.
ssh-keygen -t ed25519 -C "my.email@my.email.account"
You will be prompted to put a filename in for the key pair account. Press enter to take the default. It will look something like the following:
Generating public/private ed25519 key pair.
Enter file in which to save the key (/Users/dacb/.ssh/id_ed25519):
Next, you will be prompted to enter a passphrase. You will have to enter this everytime you want to use the key. IT IS STRONGLY RECOMMENDED YOU LEAVE THIS EMPTY by hitting return.
Created directory '/Users/dacb/.ssh'.
Enter passphrase (empty for no passphrase):
You will see some output that includes a cute little keyprint. It is mostly useless. Make sure the keys are generated by doing the following:
ls -la ~/.ssh
It should show some files, like the following:
drwx------  3 dacb dacb  4096 Nov  7 10:19 .
drwxr-x--- 42 dacb dacb  4096 Jan 15 15:47 ..
-rw-------  1 dacb dacb   411 Aug  3  2022 id_ed25519
-rw-r--r--  1 dacb dacb    99 Aug  3  2022 id_ed25519.pub
3b. Copy the public key to GitHub
Now you need to copy the public portion of the key to GitHub. Get the contents of the public key with the following:
cat ~/.ssh/id_ed25519.pub
It will look like what appears below, but definitely not identical:
ssh-ed25519 BBBBC3NzaC1lZDI1NTE5BBBBIDmRA3d51X0uu9wXek559gfn6UFNF69yZjChyBIU2qKI my.email@my.email.account
Go to GitHub.com and click on your profile icon on the top right. Select “Settings” from the drop down. On the new page, in the “Access” menu, select “SSH and GPG keys”. Click on the “New SSH key” button and give the key a title, e.g. “CSE 583 key” and copy and paste the output from the cat command above and click “Add SSH key” to finish.
Test the ssh key with the following:
ssh -T git@github.com
You should see the following:
Hi dacb! You've successfully authenticated, but GitHub does not provide shell access.
4. Installing Python via Anaconda / Miniconda
We recommend that you use the most recent version of Python 3. Slightly earlier versions of Python 3 work as well. There are some differences between Python 2 and Python 3, and many systems only include Python 2.7 as a standard installation. A Python installation for this course will be managed by the conda package management system, described below.
Conda is a system for installing and otherwise managing Python and other software packages. We recommend that you install conda from the open source community managed conda distribution because they offer terms of service that best align with academic research. The installers are available here, scroll down to the Install heading and follow the directions for “Unix-like platforms” (Windows users will be installing this using their WSL bash terminal). Let it install in the default location and answer “yes” to the installer question about initializing conda.
Below are detailed instructions after you have installed conda:
- Update conda’s listing of packages for your system: $
conda update conda - Install Jupyter notebook and its requirements: $
conda install jupyter notebook - Test that Jupyter notebooks run using the terminal to start the notebook: $
jupyter notebook
If everything has worked correctly, it should print a URL to the console that opens an empty notebook. Depending on settings, it may automatically open the notebook server in your default browser.
5. Install a terminal text editor (if you don’t already have one!)
We highly suggest using Nano, an easy to use text editor in the terminal.
You might already have Nano installed. To check, enter $nano -version in the Terminal.
If you get a version number back, for example Nano 8.6, then you have Nano installed.
Nano is not installed if you get an error message saying: command not found: nano.
Note that some users have reported that on Windows using WSL they need to use $nano --version
instead.
Note that on macOS, your Nano version will likely return a version of Pico, for example Pico 5.06.
For the purposes of this course, Pico and Nano are identical terminal text editors.
Installing Nano on a Linux operating systems (including WSL on Windows!)
For Ubuntu distributions, try $sudo apt-get install nano. For others, $yum install nano.
Installing Nano on the macOS operating system
MacOS doesn’t have a pre-installed package manager for their Unix programs. The best option is Homebrew with full instructions on the website. You can also choose to use MacPorts.
Once installed, download Nano with the following command in your terminal:
brew install nanoif using Homebrewsudo port install nanoif using MacPorts
6. Install Visual Studio Code (VS Code)
Visual Studio Code (also known as VS Code) is a graphical code editor that can be customized and extended with a vast library of open-source extensions. After installing VS Code, install the Python extension and the Jupyter extension.
If you frequently use R, you can install the R language extension too.
Visual Studio Code with Windows Subsystem for Linux
If you are using Windows and WSL, you MUST install the WSL extension for Visual Studio Code. Without this extension, you will not be able to run Visual Studio Code from WSL. Install the extension here from the Extension Marketplace.
Whenever you run Visual Studio Code from WSL, you should see a small rectangle in the bottom left corner of your window that says WSL; if you don’t see this indicator, it likely means you’re not in WSL:
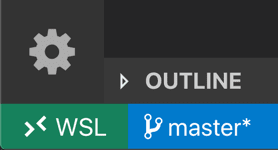
Image credit: https://code.visualstudio.com/docs/remote/wsl